This article shows the basics of learning the main rasgueados patterns.
Practice slow to learn fast, with a beat and relaxed hands!
Disclaimer
Like other forms of music, I am still very much a student of flamenco. If you want first-hand knowledge of flamenco, you should find a good teacher.
Also, you should be careful with your hands. Playing flamenco can be a lot of work (for you hands) and you should warm up slowly, stretch, take breaks, practice slowly and be patient.
Table of Contents
Practice slowly
When you are first learning this stuff you need to practice very slowly.
I would suggest setting the metronome on 60 and do one finger movement per beat.
This is very slow, but if you want to learn it, it is highly suggested that you practice in this manner at first.
It is important to focus on correct technique at first. Remember to stay relaxed. Slowly increase the metronome speed.
When you are starting out learning flamenco, you should get a teacher or be born in a family that knows flamenco. Learning online is not a good way to learn but it’s a start if you are curious.
Relax
If you want to be able to play flamenco, your hands need to be relaxed, or else you’ll never be able to play and you’ll hurt your hands.
If these exercises are too difficult, try doing them slower, more gently and more relaxed.
O, if your hands bother you, try warming up by strumming with your whole hand.
Warm Up
Before practicing rasgueados, you can do a warm up by practicing basic (rumba-style) strumming. In other words just basic up and down strumming.
Warm Up #1
- With the metronome set a very slow speed (like 35-60 bpm) for a few minutes
- Strumming up and down, rumba flamenca style (by gently spinning/twisting your hand
- Doing a “full hand rasgueado” (that’s a name I sort of made up)
- Planting my thumb by the bass E string
- Then flicking out my 4 fingers (at the same time) across the string
- Then bringing all 4 fingers back
- I actually do all the versions of rasgueados outlined below with the same click, after doing the “full hand” rasgueado
Warm Up #2 (Longer)
Please check out my Flamenco Guitar Warmup (Right/Strum Hand) for a more in depth warm up!
- Rumba Flamenca (How to Play a Basic Strumming Pattern)
- Compás, part 1 (Bulería, Alegría, basic counting)
- Six 5-10 Minute Groove Practice Ideas!
- Make your Own Backing Track (5 Minute Practice Ideas)
Notation
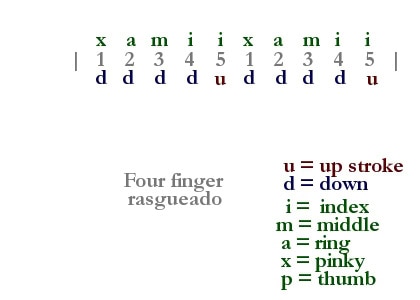
Right hand fingers
p = thumb
i = index finger
m = middle finger
a = ring finger
x = pinky
General technique to practice
When you are practicing rasgueados, you should plant you right hand thumb on the last string.
With your left hand, muffle the strings so that when you do the rasgueado, an even, percussive effect will be created. This will allow you to focus on your right hand.
Later on, you can add a few simple chords, just remember to focus on your “strumming” technique first!
Downstroke(s)
Rasgueados don’t always start on a downstroke, but if they start on the beat, they usually do. This is how most people learn to do rasgueados, too.
- Make a gentle ‘fist’ (it’s more like making the shape of an ‘O’) with your right hand
- Play each note. The index finger always plays last.
Upstroke
This is always the index finger that plays the strings. At the end of the upstroke, all the right hand fingers should almost be back to where they were before the first downstroke.
One Finger Rasgueado
Description
This isn’t really a rasgueado but all the rasgueados are built on the index finger motion. Notice how all the other fingers stay relaxed.
Diagram

Pictures for 1 Finger Rasgueado


Strum with you index finger.
Two Finger Rasgueado
Description
Just like the one finger but add the middle finger or the ring finger. People usually like one or the other.
Diagram

Pictures for 2 Finger Rasgueado


Strum with you middle finger.

Strum with you Index finger.
Three Finger Rasgueado
Diagram

Pictures


Strum with you Ring finger.

Strum with you Middle finger.

Ring & Middle fingers have already been strummed (and are below the strings)
Strum with you Index finger.
Four Finger Rasgueado
Diagram

Pictures


Pinky stays below strings after strum.
Strum with you Pinky finger.

Pinky finger has already been strummed (and is below the strings)
Strum with you Ring finger.

Ring & Middle fingers have already been strummed (and are below the strings)
Strum with you Middle finger.

Pinky, Ring & Middle fingers have already been strummed (and are below the strings)
Strum with you Index finger.
Practice Makes Progress!
All the best! Hope this helps!
If you have any questions, ideas, comments, suggestions, please leave a comment and/or send a message!